Make Your Domain First:
the beginning was to open a URL co.cc(Click here). After that, do check to co.cc domain which you want to use.
If, after the domain you want available for registration / subscription you do not have an account at co.cc (create a new user), but if you can easily get their accounts logged in.
 Once you're connected, there is a message that the field has already been registered to you, but if in 48 hours is not automatically created the domain name is abortion.
After you click the setup button and you will go to the page domain settup you, until you leave the first page here is ... co.cc. Well now you go to google services aps (click here) to create an email with your domain name to co.cc. Once inside the Google manager APS Pick: I own a domain controller and then type the domain you created earlier column in your domain name with www, then click';Get Started.

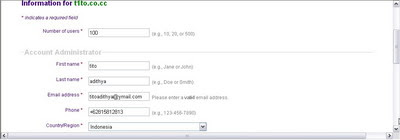
After that you will get into the setup page you input the data as requested and click continue ..
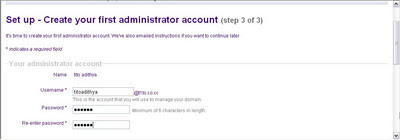
 Then be made to Item 3, at this stage requested user name, you can use e-mail (as administrator) and password entries, then the button you want to accept. Continue on.
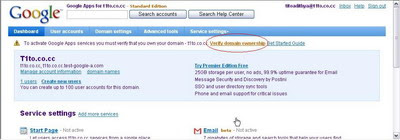
Next you will enter the Dashboard page Google Aps for your domain that had been created. This will allow you access through the address https://www.google.com/a/your domain.co.cc
example for a domain t1to.co.cc become https://www.google.com/a/t1to.co.cc. The important thing to do now is setup, and the first is to verify domain ownership. then click on the link domain Verify ownership (see picture below)
Once you enter the page to verify domain ownership. Disne there are two methods you can choose, but for now is to use the domain Co.cc purposes, here you can select Change your CNAME record (in the options column). Here you can get instructions on how to verify the method. Note the name of the CNAME should refer to the introduction on the page that you leave co.cc open earlier. So do not click here to check first and then the copy is not another point and no third. (See picture below)
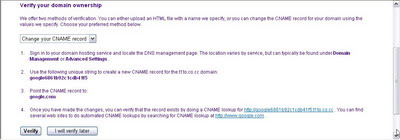
After that go back to your pages that let this co.cc, click no.2 or zone records, then copy it points no.2 (antecedent google APS) into the host plus column. Domainmu.co.cc to add your record eg: googlebffffffffff05d2t440149b37t7.t1to.co.cc and transformed into CNAME in column type/pri , Copy Rule 3 points to the column values or input the google.com the column value, then click the add records (see picture below)
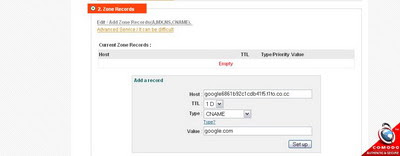
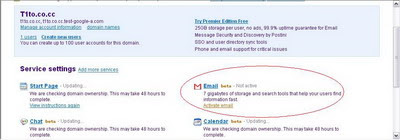
Then you into the setup pages on Google Aps that you leave open before, now you can click the Verify button. Then you will return to the Dashboard page and get a notification that is being done checking domain ownership and this could take up to 48 hours. But usually do not take that long, in fact I only take one hour. While waiting, let's move on the next steps that the activation email you. click the link to Activate email on the Service settings in the Dashboard.
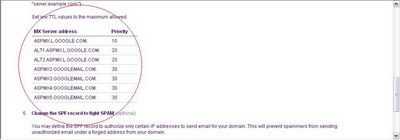
On this next page, you will be given instructions to make setup a MX record in the domain settings you have, in this case is in co.cc. Here you are shown a table containing a list of MX server address and priority values that must be included as an MX record. What you should notice is the order of these priorities have been set by Google, and we are not allowed to change the order of priority of the server. If you must change this value, it should keep the order of priority given.
Before you click the button, go back to co.cc domain settings page first. Then in the domain settings page, we will be adding the MX records and priority based on that provided by Google on top. To setiao input record in the same way. For Host, enter your domain name, for example t1to.co.cc in column Type / Pri select MX and Priority column on Google's content based on the given above, for example 10. For Value enter its MX server address, for example ASPMX.L.GOOGLE.COM. So then you click the Add button Record.
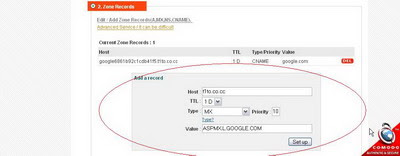
Do the same for other records until completion (see picture below) ...
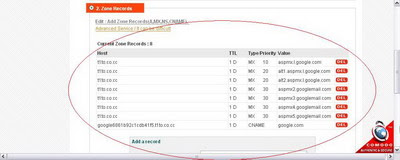
If you have, go back to Google Aps page and click the button I have completed Steps These then you will be brought back to the Dashboard Google Aps.Furthermore, on dasboard the Service settings, click on Email link. On the next page, click Change URL. On the next page, you can choose to change the address of the email access may be easier for users to remember login to an email address. Here, for example, to access the address made t1to.co.cc domain http://mail.t1to.co.cc. If not made, then the address to access only http://mail.google.com/a/t1to.co.cc. If so, click Continue.
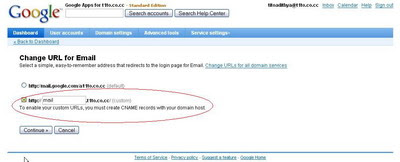
Next you'll be another clue to add a CNAME record to deal with those used in e-mails. Noteworthy is the third and fourth.
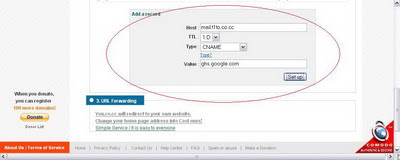
Next return to co.cc domain settings to add a CNAME record in the same way when you add a CNAME record for the number of verification of domain ownership. domain Co.cc settings page, enter your email address Host Access, for example mail.t1to.co.cc. By Type / Pri select CNAME and the value should be what Google gives point-four ghs.google.com. Then click "Add data (see figure below). Aps Back to Google, click on the button that I completed the procedure. The same may also apply to change the address of any other service, Google Aps.
Then try to return to the Dashboard, the service status, which is primarily e-mail. Possibility is currently still updating the site. This process takes time to update, although written about an hour, but could be more. email setup is now complete, awaiting trial use. When the process is complete, you can try to get http://mail. (yourDomain). Co.cc, and if so, you can be sure not to use it now.
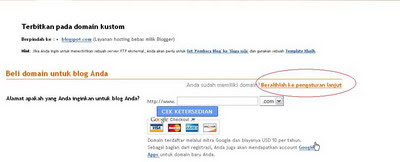
While waiting for the process of updating email let's you set your blog's address to the domain that you make in co.cc for that follow the next steps below:First - the first is used to login to blogger, then click "settings" and click again on the option "publish". published at page click "move to a custom domain name" (see picture below)
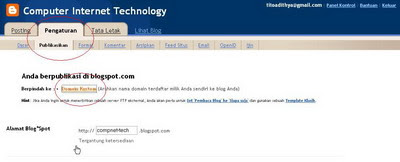
Once on the issue in a special domain click "switch kepengaturan information" (see picture below)
After the first who had let in a blogger page ... first return to the page again ... the CNAME entries co.cc Host domain name for you eg the contents with the column type www.t1to.com / pri select CNAME to value the contents with ghs.google.com (see sample taken)

After that return to the page on setting up a blogger and an input domain that you created earlier in the column of your domain name after you save it
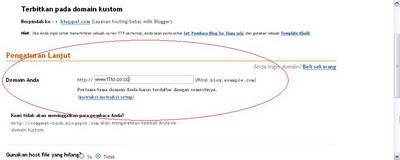
Well done for the installation is now only expected to resolve a domain is being updated is completed, usually in writing 1x48 hours, but usually does not require that long ...
Currently Congratulations you already own the domain name and email address in your domain.
Congratulations to TRY

No comments:
Post a Comment